


Description
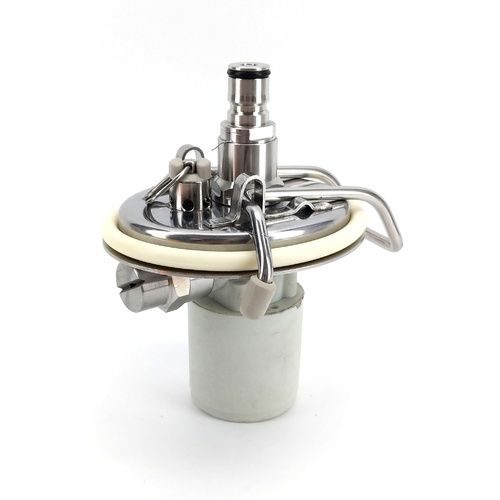
Nothing is more refreshing than having your own soda water on tap at home. SodaStream units are great but filling up those tiny 1L bottles is a pain and those small CO2 cylinders run out fast and are expensive to swap. Solve this problem once and for all with the Continuous Soda Carbonator Keg Reactor Solution.
- Position the keg inside your fridge or kegerator (ideally below 38°F).
- Attach your beverage draft line to the soda water out post.
- Attach your gas line to the gas-in post.
- Set your CO2 regulator to 30-50 psi, depending on how highly carbonated you like your soda water. We highly recommend using a check valve on your CO2 line.
- On first use, purge the air from the headspace of the keg.
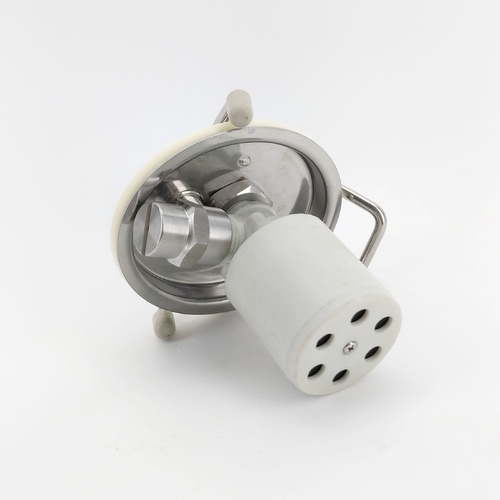
- Connect the water supply line to the water inlet post on the lid of the keg.
We recommend also using a check valve on your mains water line to prevent soda water from going back into your house mains. Depending on your mains water pressure, you may need to reduce it using an in-line regulator. For the Carbonator Keg Lid to work well, the mains water pressure should be 30-40 psi higher than your regulator set pressure (from Step 4).
That's it. This simple unit will give you continuous soda water connected to your main water supply.
For a video with directions check out the link below:
https://www.youtube.com/watch?v=XIEni6GuhQU&t=16s
Please note: if you are using a CO2 regulator that uses a corny-style PRV, you will need to swap out the standard Green PRV with the 0-100 Gray PRV so you can raise the pressure above 60 psi. Always check the pressure rating of your keg(s) before swapping the PRV.
Customer Reviews
from 495 reviews
They are so quick to help me. Their service is reliable, and the two kegs I’ve ordered have worked great!

Had a small issue with my order so I called Mike and he picked up the phone right away. He made it right and I received the correct item in about 24 hours. Highly recommend the Premium refurbished kegs.
Great local draft supply shop. Super easy CO2 tank exchange. Parts for kegs, regulators, etc.
Everything about this place is what makes small business amazing. Friendly service, fair prices, great owner.

Not much to say, good looking keg, great price
Really friendly. Quick in and out

Love it

I love it so much I'm gonna buy another soon

Arrived fast, good product and service
Bought a nitro cold brew kegerator kit from here and the level of customer service I was provided with is absolutely unmatched! When filling my order and a part was back ordered, they called and talked me through different options before filling the order. When a part was missing, they corrected the error immediately. They followed up with me by phone to take me though setup and make sure everything was working properly. Absolutely the best to work with! Thank you for a great experience. Will definitely be coming back for all future needs!
Getting my hands wet with a cold brew kegerator set up. There is a lot i tried to google myself, but there is nothing like giving this team a call and getting quality guidance and advice on my set up. I recommend them for the price, service, and communication!

Quite happy with everything I got from Corny. Dave was especially helpful in guiding me through the process and answering all my questions.
Dave just rocks plain and simple. Always helpful and very knowledgeable. Highest recommendation.

Dave offers the most wonderful and prompt support!! Great advice on setting up my systems and pointing me to other helpful resources for my business.
I have 5 total, scratch and dent Pepsi style kegs, from Corny Keg. 3 Cornelius and 2 Firestone kegs.
Nothing wrong with the Firestone kegs. I prefer the Cornelius with the complete curved bottom and they have better dip tubes.
My Cornelius dip tubes are too big in diameter, to fit in the Firestone keg. I replaced my Cornelius kegs dip tubes, with a Flotit 2.0 floating dip tube. I haven't tried the Flotit, in the Firestone keg yet.
I know the kegs are shipped without pressure. I live at almost 8,000 ft in altitude and when I receive my kegs, I know they are holding pressure. I have to blow off lots of pressure when I receive them.
They may look like crap on the outside, but the inside is beautiful!
Plus, where else can you buy used 5 gallon kegs and get a packet of spices with your order!
Looking forward to trying the Cincy Fried, packet of spices!!!
Thanks Dave!